How to Plan a Temperature Blanket
With temperature-blanket.com
February 9, 2024
Starting a temperature blanket can be a daunting task. Maybe you're thinking of starting, but you feel overwhelmed by some of these questions:
🤔 Which colors should I pick? How much yarn will I need? Where do I find weather data? What pattern should I use? Should I have 5 or 10 degree increments? Should I use the high, average, or low temperature? What even is a temperature blanket?
Hello! I'm Thomas (J), the developer of temperature-blanket.com, and in this guide I'll walk you through using the Project Planner tool on this site to hopefully remove some of the stress of starting a new project. By the end, I hope you feel educated, equipped, and excited to start creating!
The Project: Blanket? Scarf? Socks?
Yes, it's called a temperature blanket, but have you considered making some other weather-based project? If a scarf, socks, shawl, or even a ssssnake sounds more doable to you, you're free to change your idea! Blankets are fantastic but can be a big commitment. Pick a project you're likely to finish. The Project Planner was designed with blankets in mind, but it can help you plan other weather-inspired creations too.
The Place: Location, Location, Location
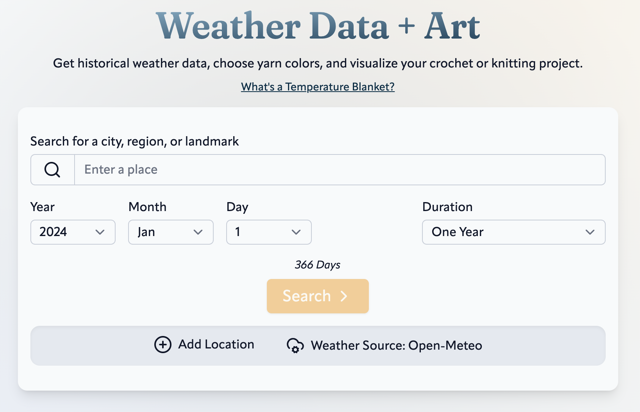
Ok, first step: go to temperature-blanket.com. Here is the Project Planner. You'll see a bit of information at the top about temperature blankets, and under that a section called Location:
🤔 What device should I use?
You can use the Project Planner on a mobile phone, tablet, or bigger computer. I recommend using the largest screen available to you.
🤔 Is there an app?
The website is the app. It's not in the Apple or Google app store, but you can install temperature-blanket.com like an app on your device.
Enter a city, region, or landmark, and select a result from the list. Great job! You're now able to press that Search button and get weather data.
The Time: This Year? Last Year? 50 Years Ago?
Wait! Before you search for weather, notice the Year, Month, and Day options. The default is January 1st, last year.
Now, you may want to make a project using this year's weather data, so you change the year to this year. Right? Well, you are free to do that, but I recommend a different approach.
I recommend selecting last year or an older year—at least in the beginning when you're planning your project. Here's why: all the weather data for this year isn't available yet, so you won't be able to fully take advantage of the Project Planner if you change the date to this year.
If you do want this year's weather data, you can always come back and change the date after going through the other sections of the Project Planner. All your color and pattern settings are saved even if you change the date later and search for new weather.
🤔 How far back can I go?
It depends on the location. For some places, the oldest available weather data is about 1940.
💡 Handy Hints
- Choose a custom duration to make a smaller project.
- If you're traveling, why not add multiple locations?
The Weather: Whether Weather Matters
(It does)
So you've chosen your location and dates. Hurray! Now press that Search button.
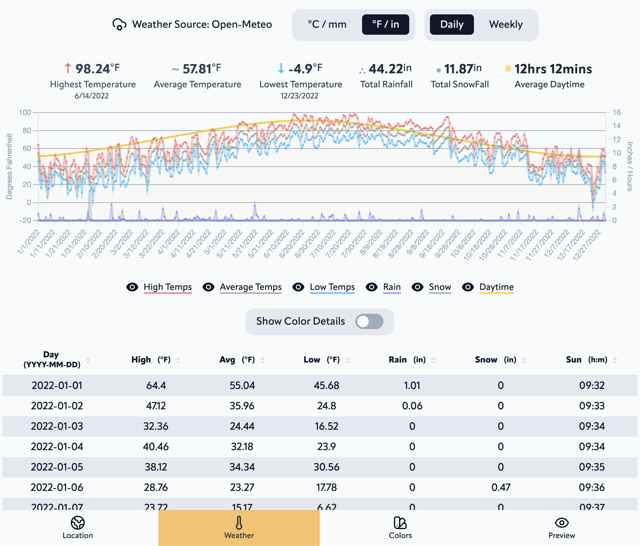
Beep boop beep...searching...searching....wait for it... Whoa! Numbers and graphs and tables! This is the Weather section.
Hey, notice those buttons at the bottom of the screen? From now on, you can use those navigation buttons to jump back and forth between any section of the Project Planner. Want to get right into picking yarn colors? Move on past the weather data by pressing the Colors button!
🤔 Is the weather accurate?
I've tried to find the highest quality and most cost-effective weather sources. The data comes from Open-Meteo and Meteostat, and they obtain their information from a variety of open sources. There is sometimes a delay of about a week for recent weather data, so if something seems off, check back in a few days.
You can investigate the weather info as much or as little as you like. The highest and lowest temperature at the top can be useful to keep in mind when you make your ranges. The data here is what the Project Planner uses to generate automatic ranges and a preview of your project.
💡 Handy Hints
- You can download the weather data as a CSV file and open it as a spreadsheet.
- Want to use custom weather data? Click on a cell in the table to change the value, or upload your own CSV file.
The Yarn: Colors Galore
There's a lot to cover in this section, but bear with me. If you haven't already, go ahead and press the Colors button at the bottom of the Project Planner.
If you're just getting started and don't know where to begin, here's a helpful order of operation:
1. Choose how many colors you want.
2. Pick which colors you want.
2. Assign ranges to each color.
I'll start with the first two: how many and which colors to use. A typical project uses between 7 and 15 colors (from now on I'll call them colorways, since we're talking about yarn). But you are free to use more or less colorways if you want. In the Project Planner, there are several ways you can pick colorways:
All at once - use the tools in the toolbar to choose how many and which colorways to use.
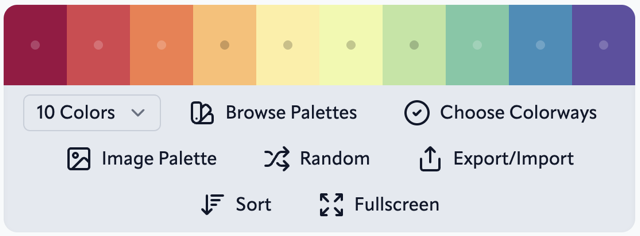
One by one - use the tools in each individual colorway to change or remove it.
I recommend starting with one of the all-at-once tools, and then editing colorways one by one as needed. For example, use the Browse Palette tool to pick a pre-made colorway combination, and then change one or two colors to fit your liking. Or pick all your colorways from scratch by using the Choose Colorways tool, and then later you can edit individual colorways if you want.
There are no right or wrong color choices, but here are some general guidelines:
- Choose a brand of yarn first to help narrow down the available colorway choices. You'll probably want to use the same or similar yarn for all your colorways.
- Organize the colorways in some way. ROYGBIV (the order of the rainbow) is a good place to start, but you could try lightest-to-darkest, similar hues together, or based on one of the combinations from the color wheel.
- Visit the project gallery for ideas an inspiration.
💡 Handy Hints
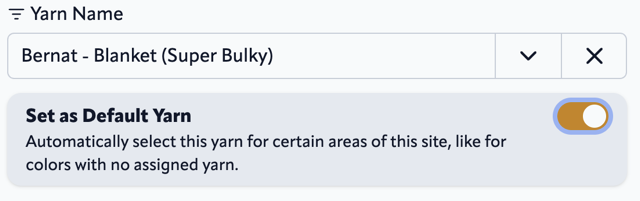
- If you know which brand and yarn you'll use, set it as the default yarn when you're choosing colorways. Now that yarn will be automatically selected when you open other tools in the Project Planner.
- A good-looking color palette is nice, but don't get too attached. You may decide to change some colorways after seeing the preview of your project. That's ok! Hold your colorway choices loosely until you're ready to start working on your project.
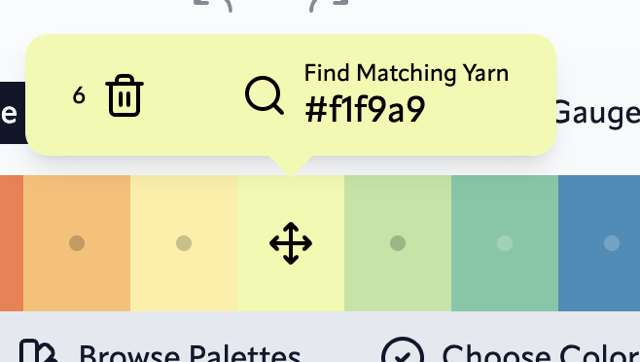
Now for the last step regarding your colorways: assigning ranges. As you may know, each colorway needs to have an assigned a temperature range. That'll determine which colorway is used on which day of your project, based on the weather for that day.
The Project Planner tries to help you assign ranges by generating automatic ranges, and letting you adjust each range if you want. Press the Customize Ranges button to get started.
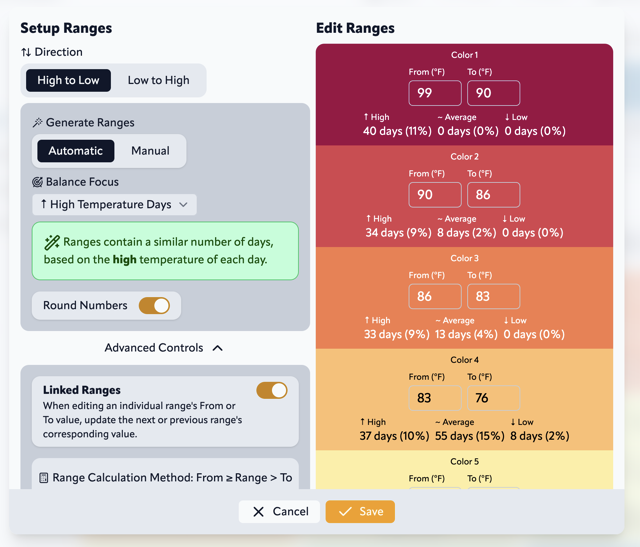
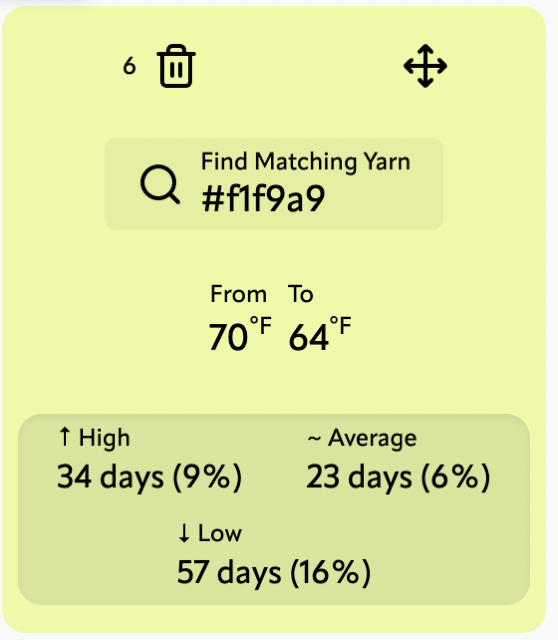
On the right inside each colorway are little groups of numbers. Keep an eye on those if you adjust range settings. Those numbers can help you gauge relatively how much of each yarn colorway you'll need for your project.
By default, the Project Planner assumes a couple things, but you can change these if you want:
- It assumes you want to use each colorway about the same number of times.
- And it assumes you want to use the daily high temperatures for your project.
Want to instead use the daily low temperatures? Or want each range to be the same (for example 5 or 10 degree increments for each colorway)? Change those settings in the Setup Ranges section.
🤔 Why do the ranges repeat values?
By default, a colorway's To value is the same as the next colorway's From value. This is because a temperature counts as inside a range if it is greater than-or-equal to the From value and less-than-and-not-equal-to the To value. If those numbers didn't repeat, a temperature that falls in between wouldn't be in any range. If you want more details, read this survey and discussion about it. It's also possible to change the Range Calculation Method.
How you adjust the ranges will affect what your project preview looks like. Don't worry, you don't have to finalize all your ranges right now. You can always come back to the Colors section and adjust the ranges.
💡 Handy Hints
- If you change the Balance Focus setting, you probably also want to adjust the preview to use the same weather parameter in the Preview section.
- Want to represent more than just temperatures in your project? Try making a gauge for rainfall, snowfall, or daytime at the top of the Colors section.
The Preview: A Sneak Peek
Now is a good time to press the Preview button at the bottom of the Project Planner. This is the final (and probably the most fun) section.
These are the options for the different kinds of layouts the Project Planner can show you.
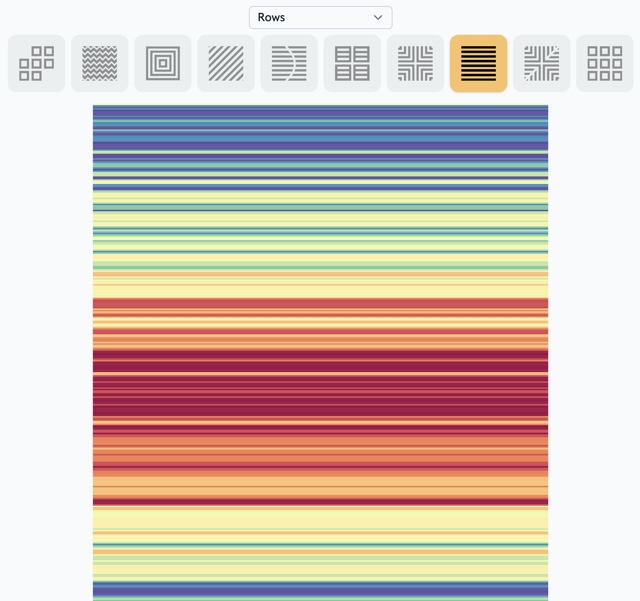
Each layout is unique and customizable. Select a different one at any time to change the preview. Some layouts can be adjusted to be smaller, larger, or different dimensions. Some let you use the high, average, or low daily temperatures in different parts of the pattern.
💡 Handy Hints
- Tap or click on the preview image to see more details.
- Save your project or share it to the gallery so you don't loose your work.
Seeing and adjusting the preview can help you make decisions before you start your project. You may decide you want to use different yarn colorways, or you may decide you want to record the daily low instead of the daily high temperature. You may want to go back to the Colors section and adjust the ranges. Go ahead! Nobody is stopping you.
Have fun exploring and customizing your project. You can jump between the Colors section and the Preview section to see how tweaking the colorways and ranges changes the preview.
🤔 Where's the pattern I should follow?
The Project Planner doesn't give you a specific pattern to follow. You can search the internet to find that elsewhere. Instead the preview is meant to give you a general idea of what your project could look like, and to help you decide which colorways and ranges to use.
The End: Get Started!
When you're happy with the colorway and layout choices, you're ready to start making your project! Gather your yarn and get creating! It's always a good idea to make a test swatch to see if you want to adjust the size or dimensions of your project.
💡 Handy Hint
Download the PDF to follow along with as you make your project. It contains a temperature gauge with your colorways and ranges, the daily weather data, and it tells you which colorways to use on which days.
Well, that's it! I hope you have a better understanding of how to plan a temperature blanket using the Project Planner on temperature-blanket.com. And I hope it takes some of the stress out of thinking about starting your project.
If there's anything you think I missed, or something you'd like to see more details about in this guide, send me an email at [email protected].